Default Workflow
MLAir is constituted of so-called run_modules which are executed in a distinct order called workflow. MLAir
provides a DefaultWorkflow. This workflow runs the run modules ExperimentSetup, PreProcessing,
ModelSetup, Training, and PostProcessing one by one.
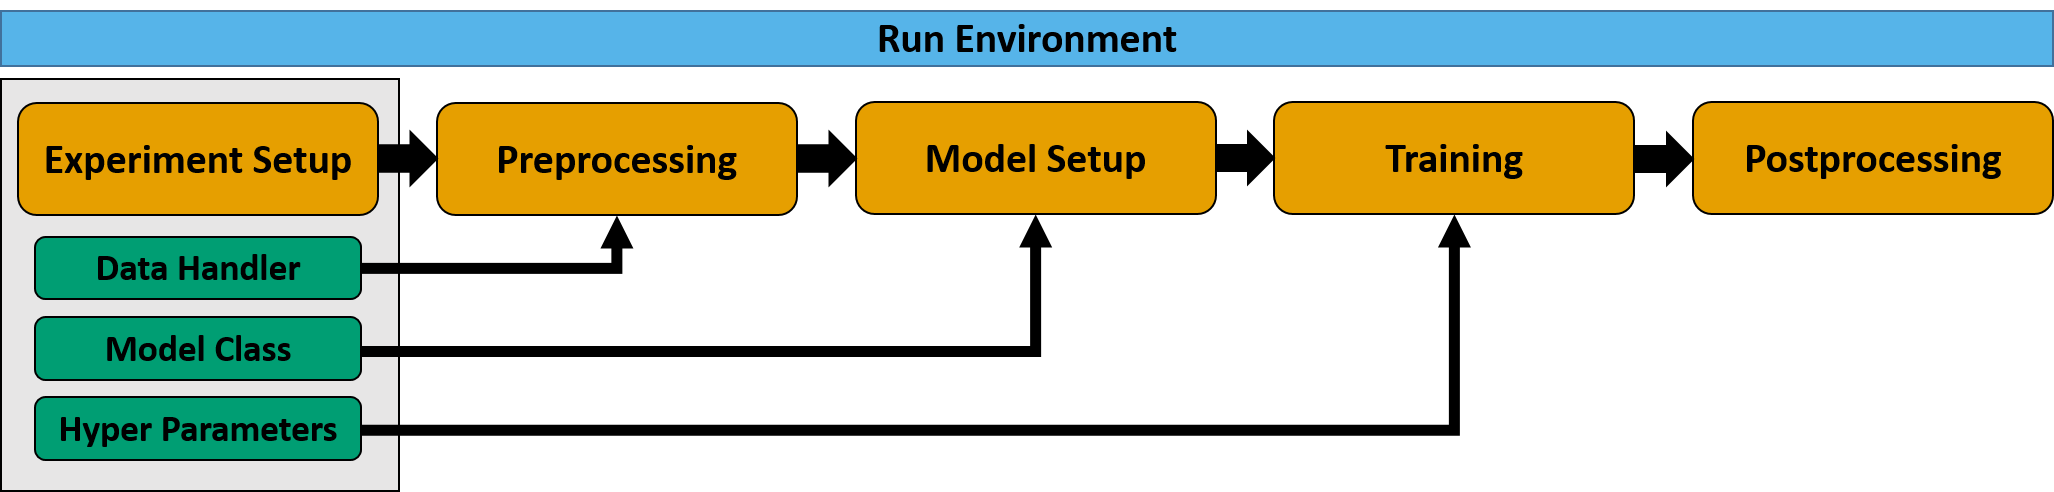
Sketch of the default workflow.
import mlair

# create your custom MLAir workflow
DefaultWorkflow = mlair.DefaultWorkflow()
# execute default workflow
DefaultWorkflow.run()
The output of running this default workflow will be structured like the following.
INFO: DefaultWorkflow started
INFO: ExperimentSetup started
...
INFO: ExperimentSetup finished after 00:00:01 (hh:mm:ss)
INFO: PreProcessing started
...
INFO: PreProcessing finished after 00:00:11 (hh:mm:ss)
INFO: ModelSetup started
...
INFO: ModelSetup finished after 00:00:01 (hh:mm:ss)
INFO: Training started
...
INFO: Training finished after 00:02:15 (hh:mm:ss)
INFO: PostProcessing started
...
INFO: PostProcessing finished after 00:01:37 (hh:mm:ss)
INFO: DefaultWorkflow finished after 00:04:05 (hh:mm:ss)
Custom Model
Create your own model to run your personal experiment. To guarantee a proper integration in the MLAir workflow, models
are restricted to inherit from the AbstractModelClass. This will ensure a smooth training and evaluation
behaviour.
How to create a customised model?
Create a new model class inheriting from
AbstractModelClass
from mlair import AbstractModelClass
import tensorflow.keras as keras

class MyCustomisedModel(AbstractModelClass):

    def __init__(self, input_shape: list, output_shape: list):

        super().__init__(input_shape[0], output_shape[0])

        # settings
        self.dropout_rate = 0.1
        self.activation = keras.layers.PReLU

        # apply to model
        self.set_model()
        self.set_compile_options()
        self.set_custom_objects(loss=self.compile_options['loss'])
Make sure to add the
super().__init__()and at leastset_model()andset_compile_options()to your custom init method.The shown model expects a single input and output branch provided in a list. Therefore shapes of input and output are extracted and then provided to the super class initialiser.
Some general settings like the dropout rate are set in the init method additionally.
If you have custom objects in your model, that are not part of the keras or tensorflow frameworks, you need to add them to custom objects. To do this, call
set_custom_objectswith arbitrarily kwargs. In the shown example, the loss has been added for demonstration only, because we use a build-in loss function. Nonetheless, we always encourage you to add the loss as custom object, to prevent potential errors when loading an already created model instead of training a new one.Now build your model inside
set_model()by using the instance attributesself._input_shapeandself._output_shapeand storing the model asself.model.
class MyCustomisedModel(AbstractModelClass):

    def set_model(self):
        x_input = keras.layers.Input(shape=self._input_shape)
        x_in = keras.layers.Conv2D(32, (1, 1), padding='same', name='{}_Conv_1x1'.format("major"))(x_input)
        x_in = self.activation(name='{}_conv_act'.format("major"))(x_in)
        x_in = keras.layers.Flatten(name='{}'.format("major"))(x_in)
        x_in = keras.layers.Dropout(self.dropout_rate, name='{}_Dropout_1'.format("major"))(x_in)
        x_in = keras.layers.Dense(16, name='{}_Dense_16'.format("major"))(x_in)
        x_in = self.activation()(x_in)
        x_in = keras.layers.Dense(self._output_shape, name='{}_Dense'.format("major"))(x_in)
        out_main = self.activation()(x_in)
        self.model = keras.Model(inputs=x_input, outputs=[out_main])
Your are free how to design your model. Just make sure to save it in the class attribute model.
Additionally, set your custom compile options including the loss definition.
class MyCustomisedModel(AbstractModelClass):

    def set_compile_options(self):
        self.initial_lr = 1e-2
        self.optimizer = keras.optimizers.SGD(lr=self.initial_lr, momentum=0.9)
        self.lr_decay = mlair.model_modules.keras_extensions.LearningRateDecay(base_lr=self.initial_lr,
                                                                               drop=.94,
                                                                               epochs_drop=10)
        self.loss = keras.losses.mean_squared_error
        self.compile_options = {"metrics": ["mse", "mae"]}
The allocation of the instance parameters
initial_lr,optimizer, andlr_decaycould be also part of the model class’ initialiser. The same applies toself.lossandcompile_options, but we recommend to use theset_compile_optionsmethod for the definition of parameters, that are related to the compile options.More important is that the compile options are actually saved. There are three ways to achieve this.
(1): Set all compile options by parsing a dictionary with all options to
self.compile_options.(2): Set all compile options as instance attributes. MLAir will search for these attributes and store them.
(3): Define your compile options partly as dictionary and instance attributes (as shown in this example).
If using (3) and defining the same compile option with different values, MLAir will raise an error.
Incorrect: (Will raise an error because of a mismatch for the
optimizerparameter.)def set_compile_options(self): self.optimizer = keras.optimizers.SGD() self.loss = keras.losses.mean_squared_error self.compile_options = {"optimizer" = keras.optimizers.Adam()}
How to plug in the customised model into the workflow?
Make use of the
modelargument and passMyCustomisedModelwhen instantiating a workflow.
from mlair.workflows import DefaultWorkflow

workflow = DefaultWorkflow(model=MyCustomisedModel)
workflow.run()
Specials for Branched Models
If you have a branched model with multiple outputs, you need either set only a single loss for all branch outputs or provide the same number of loss functions considering the right order.
class MyCustomisedModel(AbstractModelClass):

    def set_model(self):
        ...
        self.model = keras.Model(inputs=x_input, outputs=[out_minor_1, out_minor_2, out_main])

    def set_compile_options(self):
        self.loss = [keras.losses.mean_absolute_error] +  # for out_minor_1
                    [keras.losses.mean_squared_error] +   # for out_minor_2
                    [keras.losses.mean_squared_error]     # for out_main
How to access my customised model?
If the customised model is created, you can easily access the model with
>>> MyCustomisedModel().model
<your custom model>
The loss is accessible via
>>> MyCustomisedModel().loss
<your custom loss>
You can treat the instance of your model as instance but also as the model itself. If you call a method, that refers to the model instead of the model instance, you can directly apply the command on the instance instead of adding the model parameter call.
>>> MyCustomisedModel().model.compile(**kwargs) == MyCustomisedModel().compile(**kwargs)
True
Data Handler
The basic concept of a data handler is to ensure an appropriate handling of input and target data. This includes the loading and preparation of data and their provision in a predefined format. The user is given free rein as to which steps the loading and preparation must include. The only constraint is that data is considered as a collection of stations. This means that one instance of the data handler is created per station. MLAir then takes over the iteration over the collection of stations or distributes the data during the training according to the given batch size. With very large data sets, memory problems may occur if all data is loaded and held in main memory. In such a case it is recommended to open the data only temporarily. This has no effect on the training itself, as the data is then automatically distributed by MLAir.
Interface of a data handler
A data handler should inherit from the AbstractDataHandler class. This class has some key features:
cls.requirements()can be used, to request all availableargsandkwargsfrom MLAir to build the class.cls.build(*args, **kwargs)returns in default mode the class itself. This can be modified (=overwritten) to execute some pre-build operations.self.get_X(upsampling, as_numpy)should return the input data either as NumPy array or xarray. With the upsamling argument it is possible to implement a feature to weight inputs during training.self.get_Y(upsampling, as_numpy)the same but for the target data.self.transformation(*args, **kwargs)is a placeholder to execute any desired transformation. This class method is called during the preprocessing stage in the default MLAir workflow. Note that a transformation operation is only estimated on the train data subset and afterwards applied on all data subsets.self.apply_transformation(data, inverse=False, **kwargs)is used in the postprocessing to apply inverse transformation on the model prediction. This method applies a transformation stored internally in the data handler and returns the (inverse) transformed data.self.get_coordinates()is a placeholder and can be used to return a position for a geographical overview plot.
During the preprocessing stage the following is executed:
MLAir requests all required parameters that should be set during Experiment Setup stage by calling
data_handler.requirements().The data handler is build for each station using
data_handler.build(station, **kwargs)to check if data is available for the given station.If valid: The build data handler is added to a internal data collection, that collects all contributing data handlers.
MLAir creates subsets for training, validation, and testing. Therefore, a separate data handler for each subset is created using subset parameters (e.g. start and end).
Later on during ModelSetup, Training and PostProcessing, MLAir requests data using data_handler.get_X() and
data_handler.get_Y().
In PostProcessing, MLAir applies inverse transformation to some data by calling
data_handler.apply_transformation(data, inverse=True, **kwargs).
Default Data Handler
The default data handler accesses data from the TOAR database.
Custom Data Handler
Choose your personal data source, either a web interface or locally available data.
Create your custom data handler class by inheriting from
AbstractDataHandler.Implement the initializer
__init__(*args, **kwargs)and make sure to call the super class initializer as well. After executing this method data should be ready to use. Besides there are no further rules for the initializer.Implement the data providers
get_X(upsampling=False, as_numpy=False)andget_Y(upsampling=False, as_numpy=False)to return inputs (X) and targets (Y). These methods should be able to return the data both in xarray and numpy format. The numpy format is used for training whereas the xarray is used for postprocessing. Theupsamplingargument can be used to implement a custom method how to deal with extreme values that is only enabled during training. The argumentas_numpyshould trigger a numpy or xarray return format.Implement the
apply_transformation(data, inverse=False, **kwargs)to provide a proper data scaling. If no scaling is used (see annotations totransformation()) it is sufficient to return the given data without any modification. In all other cases, apply the transformation internally and return the calculated data. It is important that the custom data handler supports theinverseparameter, because it is used in the postprocessing stage. The method should therefore return data that are processed by an inverse transformation (original value space).(optionally) Create a custom
transformation()method that transforms data. All parameters required for this method should already be queried during the initialization of the data handler. For communication between data handler and MLAir the keyword “transformation” is used. If the customtransformation()returns a value, it is stored inside MLAir. To use this parameter again, it is only required to add a parameter named “transformation” in the initializer’s arguments. When using the default MLAir workflow (or the HPC version), MLAir only executes this method when creating the train data subset. Therefore a transformation logic can be created on the train data and can afterwards applied on validation and test data. If transformation parameters are fixed before running a MLAir Workflow, it is not required to implement this method. Just use the keyword “transformation” to parse the information to the data handler.(optionally) Modify the class method
cls.build(*args, **kwargs)to calculate pre-build operations. Otherwise the data handler calls the class initializer. On modification make sure to return the class at the end.(optionally) Add names of required arguments to the
cls._requirementslist. It is not required to add args and kwargs from the initializer, they are added automatically. Modifying the requirements is only necessary if the build method is modified (see previous bullet).(optionally) Overwrite the base class
self.get_coordinates()method to return coordinates as dictionary with keys lon and lat.(recommended) It is highly recommended to stay with our naming convention of data axis for an better integration into MLAir. In principle, the naming can be set from outside and changed to any naming, but this must be done consequently. We recommend therefore to use the following convention:
dimension name |
default |
meaning |
|---|---|---|
time_dim |
“datetime” |
temporal axis, every new entry along this axis is assumed to be a new sample |
iter_dim |
“Stations” |
iter axis that is a collection of different data “sources”, this could be a collection of stations or also a temporal split for a single year. |
window_dim |
“window” |
this axis is the “2nd” dimension of each samples. This could be 2D data if only a single timestamp is provided for each sample. In the default data handler, we use this dimension to provide lagged data in each sample. |
target_dim |
“variables” |
the target dim indicates where to find the target vector. Furthermore, this also contains information on the “3rd” dimension of each sample. On input site, this can be used to provide different channels (e.g. color channels). On target site, this indicates the dimension along the target variable can be found. In the default data handler this dimension is used to flag different variables. |
filter_dim |
“filter” |
This is a custom dimension, which is used by some specific data handlers implemented by the authors. It could be described as the “4th” dimension. It is always possible to define a custom 4th dimension, but it could happen, that some parts of the code will not work very well with this additional dimension. But have a try and otherwise report a bug. |
Note
The following code snippets are not up to date currently. Please read the requirements above for in-depth information what MLAir is expecting from a custom data handler!
import datetime as dt
import numpy as np
import pandas as pd
import xarray as xr

from mlair.data_handler import AbstractDataHandler

class DummyDataHandler(AbstractDataHandler):

    def __init__(self, name, number_of_samples=None):
        """This data handler takes a name argument and the number of samples to generate. If not provided, a random
        number between 100 and 150 is set."""
        super().__init__()
        self.name = name
        self.number_of_samples = number_of_samples if number_of_samples is not None else np.random.randint(100, 150)
        self._X = self.create_X()
        self._Y = self.create_Y()

    def create_X(self):
        """Inputs are random numbers between 0 and 10 with shape (no_samples, window=14, variables=5)."""
        X = np.random.randint(0, 10, size=(self.number_of_samples, 14, 5))  # samples, window, variables
        datelist = pd.date_range(dt.datetime.today().date(), periods=self.number_of_samples, freq="H").tolist()
        return xr.DataArray(X, dims=['datetime', 'window', 'variables'], coords={"datetime": datelist,
                                                                                 "window": range(14),
                                                                                 "variables": range(5)})

    def create_Y(self):
        """Targets are normal distributed random numbers with shape (no_samples, window=5, variables=1)."""
        Y = np.round(0.5 * np.random.randn(self.number_of_samples, 5, 1), 1)  # samples, window, variables
        datelist = pd.date_range(dt.datetime.today().date(), periods=self.number_of_samples, freq="H").tolist()
        return xr.DataArray(Y, dims=['datetime', 'window', 'variables'], coords={"datetime": datelist,
                                                                                 "window": range(5),
                                                                                 "variables": range(1)})

    def get_X(self, upsampling=False, as_numpy=False):
        """Upsampling parameter is not used for X."""
        return np.copy(self._X) if as_numpy is True else self._X

    def get_Y(self, upsampling=False, as_numpy=False):
        """Upsampling parameter is not used for Y."""
        return np.copy(self._Y) if as_numpy is True else self._Y

    def __str__(self):
        return self.name
Customised Run Module and Workflow
It is possible to create new custom run modules. A custom run module is required to inherit from the base class
RunEnvironment and to hold the constructor method __init__(). This method has to execute the module on call.
In the following example, this is done by using the _run() method that is called by the initialiser. It is
possible to parse arguments to the custom run module as shown.
import mlair
import logging

class CustomStage(mlair.RunEnvironment):
    """A custom MLAir stage for demonstration."""

    def __init__(self, test_string):
        super().__init__()  # always call super init method
        self._run(test_string)  # call a class method

    def _run(self, test_string):
        logging.info("Just running a custom stage.")
        logging.info("test_string = " + test_string)
        epochs = self.data_store.get("epochs")
        logging.info("epochs = " + str(epochs))
If a custom run module is defined, it is required to adjust the workflow. For this, you need to load the empty
Workflow class and add each run module that is required. The order of adding modules defines the order of
execution if running the workflow.
# create your custom MLAir workflow
CustomWorkflow = mlair.Workflow()
# provide stages without initialisation
CustomWorkflow.add(mlair.ExperimentSetup, epochs=128)
# add also keyword arguments for a specific stage
CustomWorkflow.add(CustomStage, test_string="Hello World")
# finally execute custom workflow in order of adding
CustomWorkflow.run()
The output will look like:
INFO: Workflow started
...
INFO: ExperimentSetup finished after 00:00:12 (hh:mm:ss)
INFO: CustomStage started
INFO: Just running a custom stage.
INFO: test_string = Hello World
INFO: epochs = 128
INFO: CustomStage finished after 00:00:01 (hh:mm:ss)
INFO: Workflow finished after 00:00:13 (hh:mm:ss)